WUAIR Coding Tutorial
Intro
This tutorial is a brief overview of the different departments of WUAIR, the problems they seek to solve, and how we develop in a ROS 2 environment.
It will guide you through developing Python code in an IDE and integrating that workflow with our Docker setup. If you are confused about Docker, Git, or ROS that’s okay! Please see the guides we have on the documentation site as well as any other online resources.
Along with developing code you will also learn how we test code. After all, we don't have a physical car to drive in. Instead we will use the Edinburgh University Formula Student (EUFS) simulator to watch our code running. This will be a critical part of every team’s development process and crucial to understand.
Getting Started
Matching our own software stack the tutorial code is intended to be completed moving from perception, state estimation, path planning, and control in that order. By the end of the tutorial you will have made a completely fully autonomous driving car! Though because of the simplicity if may not be the most preformant 🙃.
Cloning The Repo
To begin clone the following repository to your wuair/wuair_system/src directory.
If you are using Windows you will need to start WSL before navigating to this directory. In the terminal run:
wsl
cd ~/wuair/wuair_system/src
Clone the code using:
git clone git@github.com:WU-AI-Racing/wuair_tutorial.git
If you are missing branches run git fetch --all
If you have any other wuair team repos (perception, state estimation, path planning, control) make sure all local changes are pushed to GitHub and delete them using rm -fr before building the ROS workspace.
IDE Setup
Next open that document in your IDE of choice. If you don’t already have one installed we recommend vscode.
To open a directory in vscode use code <replace_path>. For your current directory run code .
The /src folder is connected both to your local computer and to the Docker container running ROS. This will allow you to edit code and see your changes update live in the ROS workspace.
Starting Docker
Next start the docker container as described in your operating systems respective guides:
Once you have started the Docker container you are ready to go and can move on to running and writing code!
Running ROS code & EUFS
To test your code we will be using the physics based EUFS simulator. This will allow you to simulate and visualize autonomously driving a car, as well as ROS topics you publish.
If you are confused about any of the ROS terminology please see the What is ROS? guide
To see the car model and ROS topics in 3D the simulator uses the open source RViz software.
To start we will build the ROS work space. If you would like to use aliased shortcut commands to reduce typing source the provided bashrc file with the following command: source src/.rosbashrc.sh.
First we need to run .r or source /opt/ros/humble/setup.bash depending on if you are using the regular or aliased commands.
Next we need to build the work space by running:
colcon build --symlink-install
Then run .w or source /ros2_ws/install/setup.bash
If the build finishes then you are good to go! It should succeed initially before you write any code, but as you develop you may introduce errors that stop the ROS workspace from building. In that case you should look at the error messages and fix any problems.
Next we will run the EUFS simulator with the following command:
ros2 launch eufs_launcher eufs_launcher.launch.py
When the GUI pops up select the following options: If you are testing perception, uncheck the “Use Simulated Perception” box as shown below.
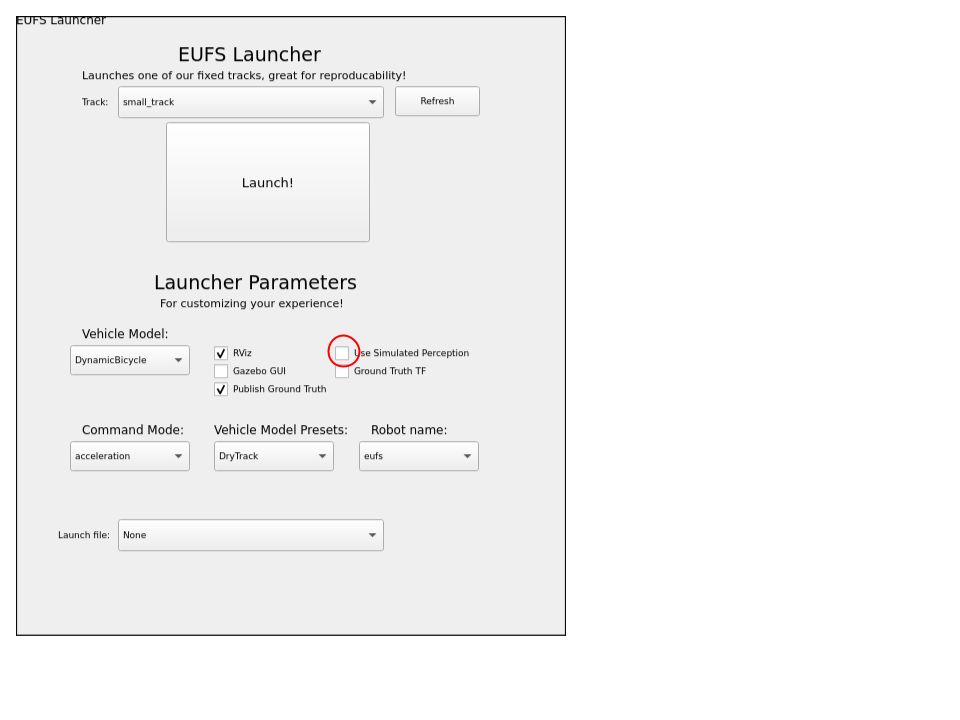
This will allow you to access the raw LiDAR data we use for the clustering based cone identification algorithm in this tutorial instead of using EUFS’s own perception algorithm which simply publishes to the /cones topic.
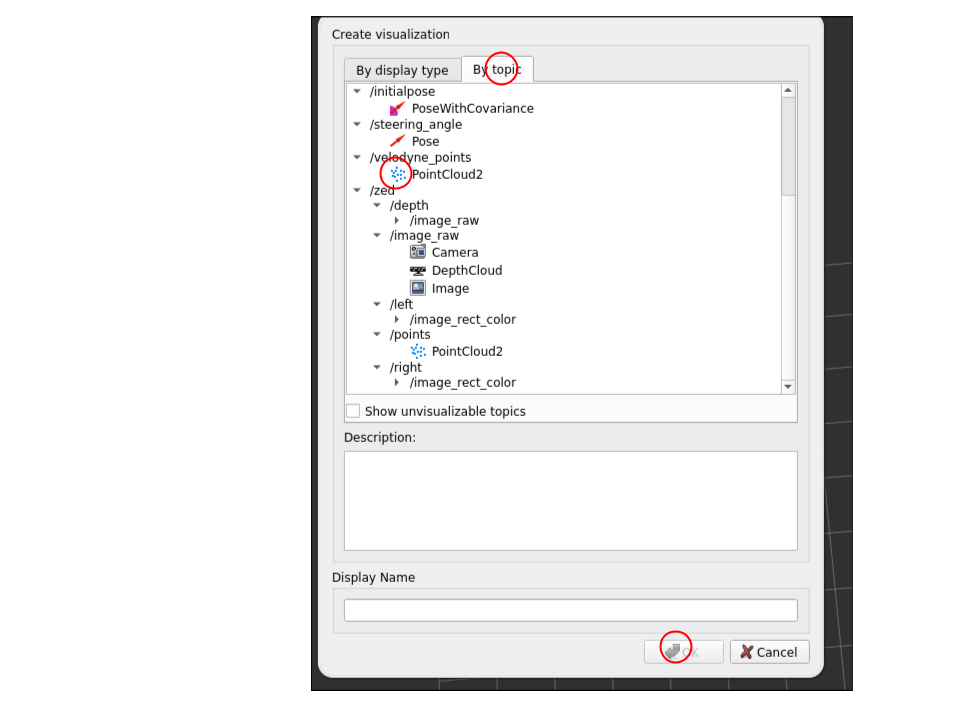
To visualize other topics first click add in the bottom left of the window:

Then switch to the topics tab in the pop up menu and select a topic to visualize. For the perception alogirhtm we are cluster the Velodyne LiDAR data so I may be useful to visualize. You will do a similar process when adding your custom path planning visualization.
I recommend using the EUFS simulated perception for testing the state estimation, path planning, and control modules if you are having trouble with the tutorial perception.
Coding Assignments
For each module open the directory corresponding to the team, i.e. /perception. In each module’s directory there will be another sub directory called <module name>/<module name>_pkg/. This will contain the two files you will need to work on for each module. The first is the logic and algorithms of the node contained in the python file named after the module. The other file is the ROS 2 node which may or may not have a task to complete depending on the module. Once you complete the missing code under each TODO will be ready to build and test your code.
To build use:
colcon build --symlink-install
The symlink will allow you to make changes to your files and test them without rebuilding. However, if you make major changes such as modifying the inputs of a function or deleting a variable you may have to rebuild.
Now with EUFS open in one terminal open a new terminal in the docker container. First, outside of the docker container go to wuair/wuair_system.
Then run:
docker-compose exec humble bash.
This should open a new terminal within our container.
You will need to re-source the bashrc files with source src/.rosbashrc.sh and run .r again.
Now you can run any of the nodes as follows:
-
Perception:
ros2 run perception_pkg perception -
State estimation:
ros2 launch state_estimation_pkg slam_launch.py -
Path planning:
ros2 run path_planning_pkg planner -
Control:
ros2 run control_pkg control
For convenience you can also use the GUI launch script to avoid excessive terminals:
ros2 run wuair_launcher gui
Perception
Make sure "Use Simulated Perception" is off and you launch with the ADS-DV.
In this module, you will implement a LiDAR processing pipeline in perception_pkg/perception.py. The raw data comes in as a large array of points (x, y, z). Your goal is to filter this data and group points into objects (cones).
-
Ground Removal: The LiDAR sees the floor as thousands of points. You need to implement a filter in
find_cones()that removes any points below a certain Z-height (ground_thresh). -
Distance Filtering: The sensor also sees the car itself! You must apply a "Donut" filter to remove points that are too close (hitting the car body) or too far away (background noise).
-
Clustering: Use DBSCAN to group the remaining floating points into clusters.
-
Centroid Calculation: Calculate the mean X and Y of each cluster to find the center of the cone.
Visualizing Data:
To verify your code is working, you need to visualize the PointCloud in RViz.
click the Add button in the bottom left.
Select the By Topic tab.
Find and select the Velodyne Points topic.
State Estimation
Launch using the launch script. Note that the files for this module are named mapper.py and mapper_node.py respectively.
In this module, you will implement a SLAM (Simultaneous Localization and Mapping) system. The perception module gives you cones relative to the car, but the car is moving!
-
Update Pose (Dead Reckoning): In
mapper.py, implement the math to update the car's global x, y, and yaw based on velocity and steering inputs. Remember that position updates depend on the trigonometry of your heading (cos for X, sin for Y). -
Transform Cones: You will convert the "local" cone coordinates (relative to the car) into "global" map coordinates using a 2D rotation matrix.
-
Data Association: Implement
add_to_map_if_new()to check if a cone you see is new or if it's one you've already mapped. This usually involves checking the distance to known cones.
Path Planning
In this module you will take the cones you mapped with the state estimation package and plan a path through them.
-
Midpoint Calculation: In
path_planner.py, iterate through the blue cones and find the closest corresponding yellow cone. Calculate the midpoint between them to find the center of the track. -
Sorting: The midpoints might be discovered in a random order. Sort them by distance from the car so the path is continuous.
-
Smoothing: The raw midpoints will be jagged. You will use scipy splines (splprep, splev) to interpolate a smooth curve through the points.
-
Visualization: In
planning_node.py, you will also implement the logic to publish these lines to RViz so you can debug the path.
Control
Congrats on getting to the end! Now you just need to make the car move.
You will implement a Pure Pursuit controller in control_pkg/pure_pursuit.py.
-
Lookahead Point: Find a point on the planned path that is a specific distance (
lookahead_dist) away from the car. -
Steering Calculation: Calculate the curvature required to drive an arc from the car to that target point. Be careful with your trigonometry (arctan) and ensure you clamp values to the physical limits of the steering rack.
-
Speed Control: Implement logic to slow the car down when the steering angle is high (cornering) and speed up on straights.
-
Acceleration: In
pure_pursuit_node.py, implement a P-Controller to calculate the acceleration required to reach your target speed.